A huge thank you to moms Leslie Mingo and Heather Erickson for their fabulous idea and help making this Halloween craft!
You'll need: strips of orange and yellow tissue paper, squares of black construction paper, green curling ribbon, a balloon for each student plus a few extra just in case, a mixture of 1 part Elmer's glue (the white liquid kind) and 1 part water, sponge paint brushes, a hole punch, scissors, and tape.
- Students blow up a balloon to their desired jack-o-lantern size being careful not to under- or overfill (since the goal is to be pumpkin-shaped). Encourage them to help one another tie it off.
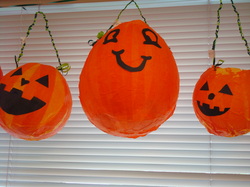
- Students dip tissue strips in the glue-water mixture, and then sponge brush the strip vertically on the balloon. (Some students wanted to use only orange strips, others preferred the two-tone look.) NOTE: This step is potentially messy because the colored tissue bleeds into the glue mixture and thence onto fingers, brushes, desks, etc. So, beware.
- Once the balloon is completely covered with tissue strips, students must continue to add two more layers of strips. After this step is completed, students should set aside their pumpkin to dry and clean their desk for the next steps.
- Now that their desk is clean, students draw and cut out a face for their jack-o-lantern from the black paper.
- Next, they use 2 strands of green curling ribbon (again one- or two-toned) to create the handle. I like to tape the strands to the edge of their desk with masking tape on which they neatly write their name. (This will become the label for their completed pumpkin.) The student knots the 2 ribbons together leaving enough at both ends (preferably about 2 inches) to attach to their pumpkin.
Generally speaking, the pumpkins need 24-hours to dry (depending on climate, amount of glue used, thickness of tissue, etc.)
The next day, students can use scissors to pop the balloon and clean up the ragged pumpkin top. Next, it's time to glue on the face. Then, they punch a hole on each side, tie on their green handle, and use scissors to curl the ends (optional).
The next day, students can use scissors to pop the balloon and clean up the ragged pumpkin top. Next, it's time to glue on the face. Then, they punch a hole on each side, tie on their green handle, and use scissors to curl the ends (optional).
 RSS Feed